Tiller pilots
Fitting a Raymarine TP1000
Note: Although this page shows the fitting of a Raymarine tiller pilot, the Simrad models are very similar. It is worth checking the dimensions from the manufacturers web sites before buying, but it shouldn’t be difficult to fit the smaller models from both manufacturers. (Note: – the details of this installation show pictures of both a new and an existing installation on 2 separate boats. My own boat had all the fittings, but no tiller pilot. It was used as the basis for a new installation on the other boat, for a Raymarine TP1000, and provided a useful check on positioning the pins and electrical socket).
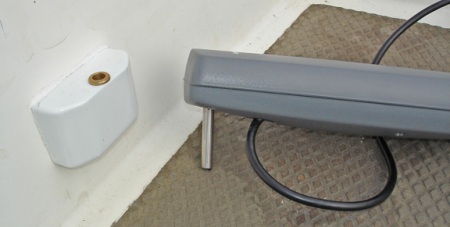
The Raymarine tiller pilot fits on two pins, one on the tiller and the other one on the coaming or in the cockpit. It needs a pin-to-pin measurement of 589mm. On a Corribee, this makes it too short to fit the cockpit pin on top of the coaming, and there is not enough clearance for the back of the unit to fit it on the cockpit seat. Alternative fittings are available from Raymarine, but they are fairly expensive – a pedestal assembly is around £25, tiller brackets around £20 and threaded pins £11. If you have some basic workshop facilities they can easily be made up to suit your installation.
The tiller fitting – a copy of the one available from Raymarine -has been made from a strip of 316 stainless. It was curved to fit the underside of the tiller using a press tool, though the shape could also be formed using a vice. The pin is the same shape as the one provided, 1/4″ diameter brass, with an M6 thread and held in place with two nuts. Raymarine recommend fitting with through bolts, but the tiller on a Corribee is so light I think the 30mm self tappers shown are strong enough.
I made the cockpit fitting from 6mm thick Tufnol – 5 layers, glued together with epoxy resin. It was then drilled to take the supplied brass bush and shaped on a disc sander . The bush was a light interference fit in the block, but could also be fitted with a little epoxy. The block is fixed to the side of the cockpit with Sikaflex 291. Again, this is a copy of the block fitted to my own Corribee.
The drawings below give an idea of the dimensions of both fittings, few of which are particularly critical. The only points worth noting are:
1. The thickness of the block – the brass bush must be far enough away from the cockpit side so the tiller pilot doesn’t make contact, and
2. The distance between centres should be 589mm (23.2″), as shown in the Raymarine instructions.
You may wish to change the other dimensions shown to suit your tiller and the height you wish to have the tiller pilot.
The power socket needs to be sited where it won’t get kicked and is out of the way of the mainsheet. The ledge just in front of the mainsheet track seems a good place on a Corribee. On my own Corribee I have a blanking plate screwed on in this position, and by substituting the new socket in its’ place I was able to confirm that the position was suitable before cutting a hole on the other boat.
The tufnol block was sprayed white and stuck to the side of the cockpit with Sikaflex, held in place with masking tape for a few hours until it cured.
The unit was then tested – not much happens when the boat is in the boatyard, but you will be able to check that the tiller moves to the fullest extent allowed by the tiller pilot without fouling anything. In the central position shown here, the unit should be horizontal and at 90° to the fore-and-aft line. Provided you have achieved the 589mm dimension from pin to pin, the tiller pilot will provide equal port and starboard steering movement.
Links:
Source: corribee.org
Fitting a Simrad TP10
An owner reported that they had major problems with the Simrad TP10 when installed as per its instructions, but these were solved by moving the whole unit fitting arrangement back 6 inches.
Edit by aforementioned owner:
On the Mk1, mounting the tiller pilot is simple, since there is room to fit it directly to the cockpit seat without the need to fabricate a coming mount. The issues I had with lack on control from the TP10 have been improved with the relocation, but have not been entirely solved. It is my opinion that the TP10 just doesn’t react quickly enough to keep control of the boat. It would be useful to document other peoples experience with tiller pilots, so if you have one installed on your Corribee, please leave a comment stating which model of boat you have, the keel layout, the tiller pilot used, and your experiences with it.
Source:
http://onkudu.wordpress.com/about-the-boat/instrumentsnavigation/
Links:
http://www.simrad-yachting.com/en/
Contribute
Do you have a story, information, brochure, manual, link or other relevant content that should be on this page? If so, we would be very grateful if you would leave it as a comment or email corribeeeditors@googlemail.com so we can post here – thanks!


Leave a comment