Boom tent
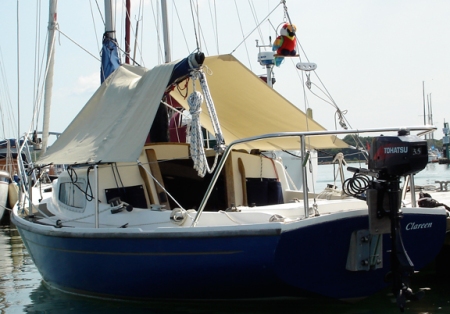
A simple boom tent is a useful thing to have aboard a small boat, as it acts as a good sunshade at anchor during hot weather, and helps to keep the cockpit dry if it rains. The one shown below was made on a domestic sewing machine using materials (fabric, thread, eyelets, zip etc) bought from Kayospruce in Fareham, Hants.

Boom tent
The fabric used is called Odyssey, colour Indian Birch and comes in a roll width of 1.5m. I used Dabond V69 UV resistant sewing thread, a heavy duty zip and and 7/16″ Hipkiss brass eyelets.

Fig 1
Fig 1 shows the overall layout, which is designed to be slung over the boom. On this sketch, the centre line runs vertically, with the forward end at the top of the picture. There is a zip which can be opened to allow it to be fitted round the aft pair of lazy jacks, and a slit which runs about a third-way along the length to go round the forward pair of lazy jacks. The overall measurements are 2.1 x 2.1m. It could be made longer of you wish, but any wider and it will be wider than the life-lines to which it will be tied.

Fig 2 Detail at corner
The Odyssey fabric cuts cleanly, but the edges should be sealed (I used a soldering iron) to prevent fraying. The outer edges of the main piece have a wide hem (about 50mm) for strength. The fabric can be folded and can be sharply creased just before sewing to give a neat edge. Before sewing the edges, prepare all the reinforcing patches (just cut to size and seal the edges, don’t bother with a folded edge). These can be stitched in place before the outer edge is sewn. Use a zig-zag stitch as it is stronger and allows for stretch. If you decide to put a zip or a split in, as shown above, you will need an extra strip of material (folded over double) to sew along the edges to create an overlap.
After the stitching is done, snip off any loose threads and use a soldering iron to seal the ends of the thread to prevent them unravelling. Bang in the Hipkiss eyelets (instructions are on the packs). You can either use some 3-strand 6mm cord tails spliced onto the eyelets as shown here, or make up some shock cord tails with plastic hooks. Shock cord shrivels in the sun after a couple of years, but is a lot more convenient to use.

Fig 3 Zip detail

Boom tent – the boom is offset to give a bit more headroom
Sewing tips
I use an old Frister Rossman sewing machine bought for a tenner at a car boot sale. It is old enough to be made of cast iron (modern plastic machines are just not sturdy enough for heavy sewing). I have been using it for about 5 years, and I’ve had it serviced once, after I tried and failed to sew some very heavy canvas and upset the needle timing. Since being serviced (it cost £40!) it runs like a Rolls-Royce. As long as the machine will sew a zig zag stitch and has a forward/reverse switch it will perform most jobs. An offset foot is also useful, as it will enable you to sew a bolt-rope into the edge of the work. A needle size of 110/18 seems to work well, though I also have some of 80/12 (often recommended for denim). Sailmaking fabrics don’t like being temporarily pinned, as the holes are left visible in the fabric. If you can crease the material into shape without pinning it will make a neater job. Double sided tape can also be used, just stick panels together with tape and sew through it. I’m told this is what sailmakers use to assemble the panels for sails before stitching.
Contribute
Do you have a story, information, brochure, manual, link or other relevant content that should be on this page? If so, we would be very grateful if you would leave it as a comment or email corribeeeditors@googlemail.com so we can post here – thanks!


September 27, 2014 at 17:23 |
The boom tent looks great. However, I needed a super quick solution so, and just incase anyone else needs the same, I went to Wicks and got a 3m x 2m blue tarp for a fiver. And bought some bungees for £7 it works a treat and fitted the boat quite well. It’s been fine moored in 30knots of wind. Looking a tiny bit worn after 2 months but still works great.