Leadline
Jonny Moore has kindly allowed us to reproduce this article:
Although Casulen II is fitted with an echo sounder, just like on any boat a leadline should also be carried. These are available to buy from most marine chandlers, but far more satisfying (and cheaper!) is to make one for your self. This is a really straightforward project, and took only a couple of hours once we had decided how to go about it. One point I should mention is that of lead being poisonous, and also giving off toxic fumes when molten. Having said that, unless you are going into mass production, this is not an issue as long as you use common sense and work in a well ventilated area. It also has to be handled carefully when molten, just like any metal.
To begin with, you need to find a couple of baked bean tins (or similar), some builder’s sand, some tinfoil, a length of steel rod (approx. 5mm diameter), some heavy garden gloves and a pair of pliers. Oh, and some lead!! (Old diving weights, lead pipe, lead roof flashing, any will do.) The first stage is to make the mould; we used a tapered wooden bung, much like the ones that should be tied next to your seacocks. The one we used was about 12cm long. This was then covered in tinfoil, leaving the wide end exposed. Next, place this into the tin and pack damp sand around it until it is level with the top of the bung. Now carefully remove the bung, leaving the foil behind in the sand to create your mould. Your steel rod is to create a hole through the centre of the lead.
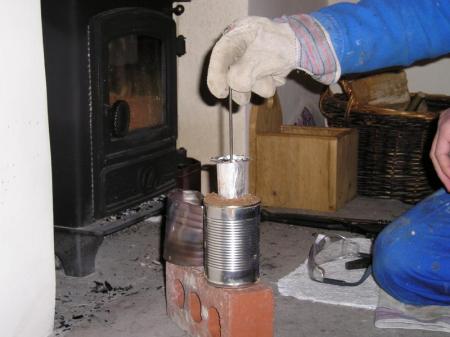
This could be drilled afterwards, but it is far easier to cast it in place. This, along with the mould needs to be close at hand when you melt your lead. It will also make your life easier if you dip the rod in grease or oil before you cast the lead. The tin that you are going to melt your lead in needs a bit of modification. You need to bend a “spout” into it and also bend the edge over to get the pliers onto, nothing fancy here, see the picture. All that remains is to melt the lead and pour it into the mould. You can use almost any heat source, but the best two are a small camping stove or a blowtorch. Up here in Cumbria, we have an open fire and this also works quite well. Lead has a melting point of around 330 degrees, so it you don’t need that much heat. Just before you pour in the lead, you need to stick the rod down the centre of the mould and hold this straight with your spare hand (I advise wearing a glove as the rod will get hot) whilst pouring the lead in so it fills the mould.
Hopefully all has gone well and you are now looking at a tin full of sand with a lump of lead in the middle of it. Also, with luck, the lead has contracted as it has cooled, and has left a dip, ideal for packing with tallow! Once everything has cooled down, you can remove the weight from the mould and pull off the tinfoil. Your rod should come out fairly easily, if not you can always persuade it with a hammer. If all else fails, melt it down and start again! You can now round off the top of the weight and remove any discrepancies with a coarse file or sandpaper. Finishing touches: You need to add around 15 metres of suitable nylon cord, we used white as it is easier to see and sewed on markings every 1mtr using some embroidery thread. You need to sort out a system of marking that works for you; the one we used is shown below.
One last thing you need to make is a “winder” for the line; a shaped piece of hardwood (approx. 250mm x 100mm) does the trick nicely. Make sure you drill a hole to tie the line through so you don’t lose it! Even though we have an echo sounder on Casulen II, we find that we use the leadline a lot, especially when anchoring as it is more reassuring to actually KNOW the depth you are in, particularly when working your way into very shallow waters of 1 or 2 metres. (As you can in a Corribee!)


August 26, 2010 at 22:33 |
Like Jonny Moore
I always have a lead line on board as a back up. My solution is some what simpler and quicker if one excludes the chat and a pint with a roofer.
The roofer provided me with an off cut of lead flashing approximatly 6 inches long by 3 inches wide. This I wraped around a broom handle to form a cylinder. I then flattened one half and folded the corners in with a little help from a hammer. A hole was drilled in the flat end and debured before fitting the line. The open clyinder end allows for a substance such as Butter or Lard to be incerted so that samples of the bottom can be collected.
July 31, 2009 at 09:39 |
[…] amount of technical information from his site to the Bouyancy, Bowsprit, Chart table, Outboard, Leadline, Legs, Solar panels and Wind vane pages. Mike Spring has allowed us to host a copy of his log for […]